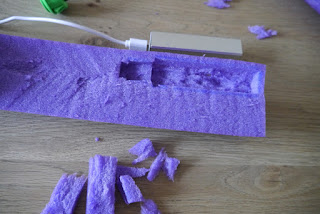
Measure a length of noodle to make a PiSaber of the right length for it's user.
Chop it in half, trying to keep the cut as straight as possible.
Now slice the tube lengthways, like a hotdog bun.
Plan out where your components will go.
Cut the handle section completely away, making sure you've enough space to include everything in your plan.
Using a sharpie, mark out where each part will got.
Hollow out the appropriate cavities using a craft knife.
Make sure you include a channel for the cables.
Work out where the button should go. Cut a suitable hole all the way through.
Do the same for the LED matrix. Cover the two halves of the handle with duct tape.
Using a skewer or other poking device, make evenly spaced holes along the length of the 'blade' of the Pi Saber. Poke the LEDs through from the inside.
Try to hollow out a shallow channel for the LED string to sit in.
Apply some super-glue to both sections of the blade, and then squeeze together. Use rubber bands or velcro strips to keep the two halves held together while the glue sets.
Assemble the handle of the PiSaber and uses cable ties or velcro straps to lock everything together.


No comments:
Post a Comment