Tuesday 9 February 2016

3D printed Astro-Pi Flight case

The AstroPi flight cases are a gorgeous piece of engineering that I've coveted since I first saw one. Sadly the aerospace-grade aluminium version is not something I'm likely you acquire for myself. However the printable version is an (almost) perfect substitute. 


Each of the four pieces needs to be put together to make the case. I used a hot-glue gun to stick the back heatsink onto the base and the middle component onto the face. The application of masking tape prior to gluing makes it easy to remove any sticky overspill around the sides.

I spent quite a while hunting for some cheap buttons but I couldn't find anything that fitted or looked suitable. So I splashed out on the actual parts used on the real thing.


When the Pi and camera are added, I think it looks great!


Almost indistinguishable from the real thing!


Thursday 4 February 2016

Getting started with the Pimoroni ESP8266 IOT pHAT


The ESP8266 pHAT from Pimoroni for adding wifi to your Raspberry Pi projects.  Here's a brief 'quick-start guide'. If you're going to use the pHAT on a Pi Zero, it can be easier to do the config on a full-size Pi then just transfer the pHAT and SD card when you're all done.


1. Start with a fresh install of Jessie

2. sudo apt-get update

3. sudo apt-get upgrade

4. sudo apt-get install minicom

5. We need to stop the Pi using the Serial port for console messages. Edit /boot/cmdline.txt to remove 'console=ttyAMA0' from the line. You should be left with:

dwc_otg.lpm_enable=0  console=tty1 root=/dev/mmcblk0p2 rootfstype=ext4 elevator=deadline fsck.repair=yes rootwait

6. sudo raspi-config. Go to Advanced Options => Serial and set it to disabled.

7. Shutdown the Pi

8. Solder the header onto the pHAT. Attach to the Pi and power up.

9. Now we can connect to the ESP8266 via a serial connection. Run minicom -b 115200 -o -D /dev/ttyAMA0


10. To test, type

AT

and hit enter/return as normal. Then type ctrl+j 

You should see the reply OK


11. Now you can start putting the ESP8266 to work. There's a useful list of AT commands here, but to get started try:

AT+CWMODE=1
AT+CWLAP

which will list all the wifi Access Points that it can see.


12. To connect to one:

AT+CWJAP="SSID","password"


Obviously replace SSID and password of the network you're trying to connect to!

13. Then find your IP address

AT+CIFSR


To disconnect for the AP, type

AT+CWQAP

Don't forget the ctrl-j after each command. 

To quit minicom, type ctrl+a then q

14 As a more advanced test, you can set up your Pi as a simple web server.  Download this really useful python code:


 git clone https://github.com/guyz/pyesp8266.git

Then change into that directory and run the server code

python esp8266server.py /dev/ttyAMA0 115200 "SSID" "password"

You should see a whole bunch of familiar AT commands being executed. When everything has finished, fire up your web browser and connect to the IP address just allocated to your PI/ESP8266.

You should see the system date displayed:


Once you're finished developing, transfer everything over to your Pi Zero.


Tuesday 2 February 2016

PiSaber construction photos

The latest issue (42) of the MagPi featured my PiSaber project. Here are some additional construction shots:

Measure a length of noodle to make a PiSaber of the right length for it's user.


Chop it in half, trying to keep the cut as straight as possible.


Now slice the tube lengthways, like a hotdog bun.


Plan out where your components will go.


Cut the handle section completely away, making sure you've enough space to include everything in your plan.


Using a sharpie, mark out where each part will got.


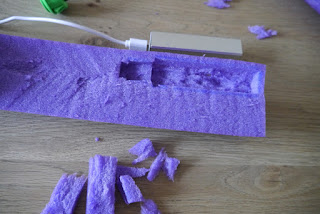
Hollow out the appropriate cavities using a craft knife.


Make sure you include a channel for the cables.


Work out where the button should go. Cut a suitable hole all the way through.


Do the same for the LED matrix. Cover the two halves of the handle with duct tape.


Using a skewer or other poking device, make evenly spaced holes along the length of the 'blade' of the Pi Saber. Poke the LEDs through from the inside.


Try to hollow out a shallow channel for the LED string to sit in.


Apply some super-glue to both sections of the blade, and then squeeze together. Use rubber bands or velcro strips to keep the two halves held together while the glue sets.


Assemble the handle of the PiSaber and uses cable ties or velcro straps to lock everything together.