Friday 23 December 2016

Amazon Alexa controlling Raspberry Pi GPIOZero Xmas lights

I've been looking for a home IoT project to setup with Amazon Alexa and my Raspberry Pi powered Christmas Tree seemed like an obvious choice.


Here's how it works:

There are 5 sets of cheapo xmas LEDs connected directly to GPIO pins on the Pi. I then use Python and GPIOZero to turn them on and off, do a bit of PWM and run some fancy sequences.  I've then integrated this code into a simple Python Flask app that essentially provides a web-interface to activate the LEDs.

The Pi is also running this awesome Home Automation Bridge code  from BWS Systems. This emulates the Philips Hue light system and can be easily configured to send web requests to other devices, in this case my Flask app.

Finally, Alexa discovers the HAB and merrily passes requests to it based on your voice commands.

All this runs fine on an old 512MB Raspberry Pi model B.

Step-by-step

1) Get and SD card with the latest version of Raspbian. Boot it and connect to your wifi

2) Find the if address of your Pi


pi@raspberrypi:~ $ ifconfig wlan0
wlan0     Link encap:Ethernet  HWaddr 00:c1:41:39:0c:3e  
          inet addr:192.168.49.213  Bcast:192.168.49.255  Mask:255.255.255.0
          inet6 addr: fe80::1185:ec1e:49f9:d936/64 Scope:Link
          UP BROADCAST RUNNING MULTICAST  MTU:1500  Metric:1
          RX packets:2270 errors:0 dropped:2 overruns:0 frame:0
          TX packets:646 errors:0 dropped:0 overruns:0 carrier:0
          collisions:0 txqueuelen:1000 
          RX bytes:327701 (320.0 KiB)  TX bytes:94619 (92.4 KiB)

3) Download the jar file for the HAB:


wget https://github.com/bwssytems/ha-bridge/releases/download/v3.5.1/ha-bridge-3.5.1.jar

4) Run this jar file:


sudo java -jar -Dconfig.file=/home/pi/habridge/data/habridge.config /home/pi/habridge/ha-bridge-3.5.1.jar

5) Point a browser at the IP of your Pi (from step 2). You should be able to connect to the HAB - click on the Bridge Control tab and you should see a screen like this:


 6) Clone my github with the  Flask app. There are two versions of the code available: one is setup to use 5 sets of LEDs while the other is a cut down version with just a single LED string configured, connected to GPIO 14 and ground. I'm assuming you've just got one LED (or a string of LEDs) from now on. 

7)  Run the app:

pi@raspberrypi:~/gp0web $ python singleLED.py 
 * Running on http://0.0.0.0:5000/
 * Restarting with reloader

8) Now we can configure our HAB. Click on the 'Manual Add' tab and fill-in the fields as shown below. The 'Unique ID' field will self-populate once you save your settings so don't worry about that.


Don't forget to change the IP address based on your setup.

9) Now save the settings and then test them. Click on the Bridge Devices tab and try to turn your LEDs on/off using the Test buttons.

If you encounter problems, check you've typed the URLs correctly and see if the Flak app is showing any errors.

10) If all is working, the final configuration  step is to ask Alexa to 'discover devices'. It should respond that it found one (unless you already have other devices on your network).

11) Now you should be able to ask Alexa to "turn on tree" (or whatever name you gave to your device in step 8). 

Friday 16 December 2016

Getting started with Android Things and Pimoroni Rainbow HAT


I was really excited to try out Android Things on the Raspberry Pi, especaiily with the sweet looking Pimoroni RainbowHAT, but found getting everything up and running initially a bit fiddly. Here are my notes on how it all works. I used a Mac as my developer box but I assume things will be fairly similar if you're using Windows. 


1. First of all, download the Android Studio and install it. On a mac this just means dragging the app into the Applications folder.  
2. Now run it. You'll be asked if you want to import anything – you probably don't. The only other optional configuration is to select a colour theme. I chose Dracula! 


3. Now we'll be able to connect to our Pi. Boot it from the Android SD card and wait for the Android Things splash screen to appear. It will show you the IP address being used by the Pi – make sure you connect it to your network via an Ethernet cable. Now open up a Terminal (or a CMD prompt if you're on a Windows box I guess) and cd to the Android SDK directory just installed. On a Mac that'll be /Users/<your user>/Library/Android/sdk/platform-tools.

4. Run the adb command to connect to your Pi, using the IP address shown on the splash screen.


5.Now head back to Android Studio. We'll check out one of the sample apps from the GitHub repo. Let's start with the simple Button app, which will illuminate one of the HAT's touch pad LEDs when the pad is pressed.

Click on 'Check out project from version Control' from the Android Studio welcome window and select 'Git'. Copy the URL of the button repo into the appropriate box. Create a folder on your developer machine where you'd like to store your AndroidThings projects and browse to that using the button next to the 'Parent Directory' text box. The sub-directory name should be filled in for you.


6. Then click the 'Clone' button, and once it has downloaded, click 'yes' on the next dialog box. 


7. Then Click 'OK' on the next one.

8. Android Studio will start to build your code, but because you haven't yet downloaded the correct SDK, you'll get an error. Just click 'OK' – we'll fix that now.


9. Back at the main Studio welcome screen (step 2), click on 'Open an existing Android Studio Project' and browse to the sample-Button folder which has just been created under the folder created in step 4. Click OK.

10. You'll see a window like this. If you look closely at the bottom of the window, you'll see some status messages.


After a few seconds you'll see a 'Failed to sync' error and a blue 'Install missing platforms' link. Click on the link.

Accept the license agreement (after reading it thoroughly, of course) and click next.

13. Then you'll get another sync error with a link to install missing Platform Tools. Click the link.

14. You might see a message about updating plugins. Click 'update'.

15. That should be everything installed. Now we can run the app. Click on 'Run App' or the green triangle. You'll be aked to select a deployment target. You should see an Unknown Iot_rpi3 device listed (if not, try and reconnect as per step 3). Click OK.
16. The screen on the Pi should change to be almost entirely white with a black band at the top with the word 'Button' Try pressing the A touchpad on the Pi and the LED on that pad should illuminate. Notice that touching either of the other 2 buttons doesn't do anything (yet).

17. Success ! Your first Android things App. Now let's hack it a bit. We'll keep it simple: let's enable touchpad B instead, but have it turn on the LED on button C. Open the Project view in Android Studio and select the BoardDefaults file from the tree in the left pane.


18. Double click on the file and have a look at the contents. You'll see two functions which we'll need to modify: getGPIOforLED and getGPIOforButton.

19. By consulting the excellent pinout.xyz entry for Rainbow HAT we can see that pin 26 is the LED for pad C and pin 20 is used for pad B itself.


20. Modify getGPIOforLED so that it returns BCM26 for Pi boards and similarly modify getGPIOforButton so that it returns BCM20.


21. Now re-run the app and deploy the new version to your Pi (click the green play button). You should see the Pi reset. Test the HAT to check that your changes have had the desired effect.  

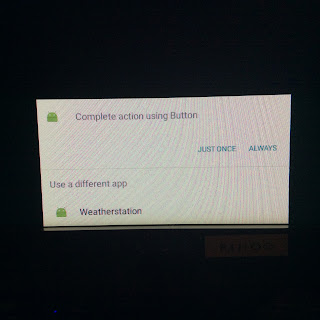
22. Now why not try the awesome weather station app which really lights up the Rainbow HAT.  Follow steps 4-17 above but choose the weather station Github repo instead.  Once you've deployed it, reboot the Pi. When it restarts you should be given the option as to which app you want to run.  Connect a mouse to the Pi and choose the Weatherstation. 


23. That's it! Now get stuck into some Java coding and explore some of the other sample code available.