One of the big takeaways for me from Skycademy was the importance of testing each element of the flight. Its' easy to get things working at home or in the classroom, but you really need to head outdoors to put some of the kit (GPS, mobile Internet, payload assembly) through their paces.
A modified version of my kite-mapping project seemed like it might be a good way of ironing out the bugs and also provide a fun way for children to get involved even if they won't be able to come to the actual launch. When I tried it, it all worked really well. Here's my step-by-step.
What you'll need
A pack of small zinc plated screw hooks and eyes
A styrofoam box
Some strips of balsa wood
Duct tape
Adhesive backed velcro strips
Kite line (100 pound flying line)
3 x Medium size washers
2 x Carabiners (the diameter of the tubing should be able to fit through the hole in the washers)
A delta kite - anything with a 7 foot wingspan or above will have enough lift.
A long kite tail and two streamers for the wings.
Gardening gloves
Raspberry Pi (A+ is ideal)
Pi-in-the-sky board
LORA board (optional)
For aerial photography, I like to use a picavet rigging to keep the payload as steady as possible. There are plenty of ways to make one of these - this is a good set of general instructions.
1. Construct your payload container. I can't see any reason why the container for a kite flight should be any different for that of a HAB launch. A simple styrofoam box makes a good starting point.
3. Attach four of the eye screws, one at each end of the cross of balsa. They should just screw in by hand without any drilling.
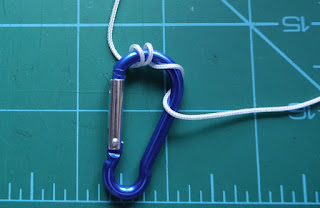
Thread a narrow carabiner through the washers. You'll use these to attach the whole thing to the kite line.
4. Test radio comms. Check that your Pi-in-the-sky board can communicate with your radio receiver. Ditto for the LORA board.
5. Test HabHub uploading. Make sure you have Internet connectivity for whatever device is receiving your transmissions. Check that data is appearing on the map.
6. Choose a flight location. You don't need a huge amount of space, but ideally you'll want a clear area twice as wide and long as the height you intend the kit to reach. I normally have 200m of line so an ideal site will be free of obstructions (trees and roads etc) for circular area of 400m diameter.
7. Assess the wind. You need some wind for the kite to fly. A big delta kite doesn't need much to get aloft, but if you want it to stay up you need at least 8mph of constant breeze. Anything much above 15mph is probably too much and you'll have a real tough time reeling the kite in again when you've finished. I have two kites: a 7' and a 9' are both are easily capable of lifting a Pi payload. Obviously the bigger kite can lift heavier payloads, but the wider wingspan and overall larger canvas area (it's 4.5' tall) can get pulled about too much in strong winds and be less stable than the smaller one.
8. Prepare your kite. Assemble the kite and attach the main tail and wing streamers. These are vital to keeping the kite level and stable in the air. Most delta kites are a similar design: a fiberglass cross spreader is inserted and this keeps the wings rigid around the central spar. Make sure that the outside spars are pushed down to the bottom of the sail and that they're not bunched up with fabric or bent.
9.Test flight. Without the payload, get the kite up in the air. take it up to at least 20 or 30m and assess the conditions. Is the kite jerking around? If it's not too stable, try increasing the altitude. If you still find that it is dive-bombing or suddenly changing position with gusts, you might want to abort the test flight until the wind is more settled. Make sure you put your gloves on before winding the kite in. Kite line can give you really nasty deep cuts or friction burns.
10. Attach the picavet. Assuming you're happy with the conditions, bring the kite down to just a few metres and attach the picavet carabiners. This is where having someone to help is useful. One person holds the kite reel while the other attaches the payload. Clip one carabiner over the line and then twist it so that you wrap the line around the tubing several times. Then do the same with the second carabiner, making sure that their spacing on the line isn't too wide (ideally it should be just slightly wide than the separation of the mounting points of the line on the longest edge of the picavet.
If it's just too windy or your by yourself, then land the kite and sit on it while you attach the payload. This sounds like an easier approach but there is more chance of the line getting tangled in the tails/streamers or the payload being dragged along the ground when you eventually take the kite airborne again.
12. Fly. Let the line out steadily and keep on eye on the flight pattern as you get higher. Listen to the kite string. If it is really thrumming then beware of sudden jerks, especially if you're letting children hold the reel. Make sure everyone who holds the reel or line wears gloves.
13. Wind the kite in. This can take a long time! A kite being flown at 150m may take up to 30 minutes to wind in!


No comments:
Post a Comment